Hercules Windows Build Instructions
(Visual Studio 2015 or greater)
Introduction
This document provides instructions on how to manually build the Windows "MSVC" version of SDL Hercules 4.x Hyperion using Visual Studio 2015 or greater. For the original Visual Studio 2008 instructions, click here.
Note: For the most direct and by far easiest method to build Hercules on Windows, it is highly recommended that you use Bill Lewis's fantastic "Hercules Helper for Windows" tool instead, and not the below manual method. Hercules-Helper completely automates the entire build process of downloading and installing all of the needed pieces and running all of needed commands to create a working Hercules. Simply download Bill's tool and enter a few simple commands, and within minutes you should have a working Hercules on your system.
To manually build the Windows MSVC version of Hercules you need to first download and install a reasonably current version of Microsoft's free Visual Studio Community Edition product, followed by a few additional very important things:
- Visual Studio Community 2019
(Free, fully-featured IDE for students, open-source and individual developers)
Note: once you've setup your build environment, (which you only need to do once and never again) the process of actually building Hercules is extremely simple: just open our pre-provided "Hercules.sln" Solution file and click the 'Rebuild Solution' button!
Summary of Steps Involved
The overall setup of your build environment is very simple, consisting of five steps, with only the first two steps being required and the other three steps being optional but recommended:
- (required) Download and install Visual Studio 2019.
- (required) Define the "VSnnnCOMNTOOLS" environment variable.
- (optional) Download and "install" the ZLIB package
- Download
- Unzip somewhere
- Define a ZLIB_DIR environment variable pointing to your directory so the Hercules build process can find the needed files.
- (optional) Download and build the BZIP2 package
- Download
- Unzip somewhere
- Define a BZIP2_DIR environment variable pointing to your directory so the Hercules build process can find the needed files.
- (optional) Download and "install" the Perl-Compatible Regular Expressions (PCRE) package
- Download
- Unzip somewhere
- Define a PCRE_DIR environment variable pointing to your directory so the Hercules build process can find the needed files.
Detailed Instructions
1. Download and Install Visual Studio
Click the download button for the "Community" edition from the Visual Studio download web page using the above link to download a small installer stub. Run the installer and select which components you wish to install, and then let the installer install your selected components.
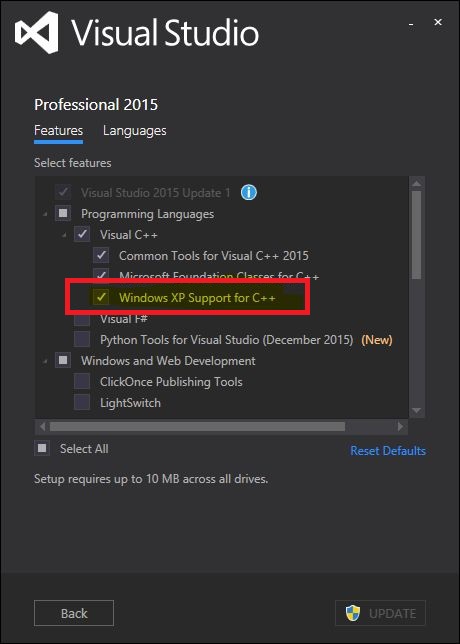
When you run the installer, be sure that you select the "Windows XP Support" component, as shown in the below sample images:

The install takes quite a while to finish, so get yourself a cup of coffee while you wait.
Once Visual Studio is installed, then you only need to do one other important thing: You need to manually define a very important environment variable so Hercules knows what version of Visual Studio you are using. This is explained in the next step.
2. Define Visual Studio "VSnnnCOMNTOOLS" variable
The environment variable to be defined is "VSnnnCOMNTOOLS", where 'nnn' is the internal version number of Visual Studio ('140' for Visual Studio 2015, '150' for Visual Studio 2017, etc). In earlier versions of Visual Studio the installer automatically defined this environment variable for you, but in later versions of Visual Studio the installer no longer does this, so you need to do it yourself:
The environment variable is named "VS140COMNTOOLS" for VS2015, "VS150COMNTOOLS" for VS2017, "VS160COMNTOOLS" for VS2019, and "VS170COMNTOOLS" for VS2022. It defines the Visual Studio "...\Common7\Tools" directory, which allows Hercules to locate the necessary batch files to properly initialize Visual Studio's build environment.
- Go to "Control Panel" --> "System and Security" --> "System".
- Click on the "Advanced system settings" link.
- Click on the "Environment Variables..." button.
- Add a new environment variable as described below to the "User variables".
For VS2015 up to and including VS2019, this value should be:
C:\Program Files (x86)\Microsoft Visual Studio\yyyy\Community\Common7\ToolsStarting with Visual Studio 2022 however, Visual Studio is now a 64-bit application (not a 32-bit application like earlier versions), so for Visual Studio 2022 and greater, the value should be:
C:\Program Files\Microsoft Visual Studio\yyyy\Community\Common7\Toolswhere 'yyyy' is of course the version of Visual Studio: "2015", "2019", "2022", etc.
Before your newly defined environment variables can take effect, you will need to first logoff and then log back on again! Earlier versions of Windows are smart enough to dynamically update the environment immediately after being modified, but Windows 10 is different! You have to logoff and logon again (or reboot your system) before the new environment variables will take effect!
3. Setting up ZLIB Support
ZLIB is a compression algorithm written by Jean Loup Gailly and Mark Adler and may be used in the Hercules project pursuant to the ZLIB License (a copy of which may be seen at http://www.zlib.net/zlib_license.html).
In source form, the Hercules project does not contain any ZLIB source code at all.
In binary form however, the Hercules project may include an unmodified version of the ZLIB runtime DLL in addition to its own distribution binaries.
The 'ZLIB_DIR' environment variable defines the location of where the needed files are for building a version of Hercules that supports ZLIB compression. The makefile used by the Hercules build process tests whether this environment variable is defined or not in order to know whether you wish to build ZLIB compression support into Hercules or not.
If 'ZLIB_DIR' is undefined when you build Herc then it tries looking for it in a predefined default directory. If it doesn't find it then ZLIB support will simply not be generated. Otherwise 'ZLIB_DIR' must point to a valid directory where the ZLIB package is installed.
ZLIB_DIR should contain the path of the ZLIB directory. This means the following file/directory layout is expected:
            $(ZLIB_DIR)

                zlib1.dll
                zlib1.pdb

                include
                    zconf.h
                    zlib.h

                lib
                    zdll.lib

                x64

                    zlib1.dll
                    zlib1.pdb

                    include
                        zconf.h
                        zlib.h

                    lib
                        zdll.lib
When building a 64-bit (x64) version of Hercules the above 'x64' subdirectories
are automatically searched, so as long as the above directory structure is adhered to
then Hercules should build fine.
4. Setting up BZIP2 Support
BZIP2 is a freely available (open-source (BSD-style) license), patent free (as far as the author knows), high-quality data compressor written by Julian R Seward. It typically compresses files to within 10% to 15% of the best available techniques (the PPM family of statistical compressors), whilst being around twice as fast at compression and six times faster at decompression.
In source form, the Hercules project does not contain any BZIP2 source code at all.
In binary form however, the Hercules project may include an unmodified version of the BZIP2 runtime DLL in addition to its own distribution binaries.
If 'BZIP2_DIR' is undefined when you build Herc then it tries looking for it in a predefined default directory. If it doesn't find it then BZIP2 support will simply not be generated. Otherwise 'BZIP2_DIR' must point to a valid directory where the BZIP2 package is installed.
BZIP2_DIR should contain the path of the BZIP2 directory. This means the following file/directory layout is expected:
            $(BZIP2_DIR)

                bzlib.h
                libbz2.dll
                libbz2.lib
                libbz2.pdb

                x64
                    bzlib.h
                    libbz2.dll
                    libbz2.lib
                    libbz2.pdb
When building a 64-bit (x64) version of Hercules the above 'x64' subdirectories
are automatically searched, so as long as the above directory structure is adhered to
then Hercules should build fine.
5. Setting up PCRE Support
PCRE (Perl-Compatible Regular Expressions) is: "a set of functions that implement regular expression pattern matching using the same syntax and semantics as Perl 5. PCRE has its own native API, as well as a set of wrapper functions that correspond to the POSIX regular expression API. The PCRE library is free, even for building commercial software."
In source form, the Hercules project does not contain any PCRE source code at all.
In binary form however, the Hercules project may include an unmodified version of the PCRE runtime DLLs in addition to its own distribution binaries.
NOTE: the Perl-Compatible Regular Expressions library is needed only to support the Hercules Automatic Operator (HAO) Facility. If you do not plan to ever use the Hercules Automatic Operator facility, then you do not need to install PCRE support and may safely skip this step.
If 'PCRE_DIR' is undefined when you build Herc then it tries looking for it in a predefined default directory. If it doesn't find it then regular expression support will simply not be generated. Otherwise 'PCRE_DIR' must point to a valid directory where the PCRE package is installed.
PCRE_DIR should contain the path of the PCRE directory. This means the following file/directory layout is expected:
            $(PCRE_DIR)

                bin
                    pcre3.dll
                    pcre3.pdb
                    pcreposix3.dll
                    pcreposix3.pdb

                include
                    pcre.h
                    pcreposix.h

                lib
                    pcre.lib
                    pcreposix.lib

                x64
                    bin
                        pcre3.dll
                        pcre3.pdb
                        pcreposix3.dll
                        pcreposix3.pdb

                    include
                        pcre.h
                        pcreposix.h

                    lib
                        pcre.lib
                        pcreposix.lib
When building a 64-bit (x64) version of Hercules the above 'x64' subdirectories
are automatically searched, so as long as the above directory structure is adhered to
then Hercules should build fine.
Building Hercules using the Visual Studio IDE
Once you have installed Microsoft's Visual Studio Community Edition and have defined your VSnnnCOMNTOOLS environment variable and rebooted, you can then very easily build Hercules whenever you need to via the Visual Studio solution and project files provided as part of the Hercules itself. (Note: it is recommended that you git clone the repository and build from that, and not from any downloadable source code .zip file.)
Simply open the provided "Hercules_VS2015.sln" or "Hercules_VS2022.sln" Solution file in Visual Studio, select your desired Solution and Platform build configuration from the dropdown list boxes on your toolbar at the top of the screen (Debug/Win32, Release/Win32, Debug/x64, or Release/x64) and then click the "Rebuild Solution" button! (Or select the equivalent "Rebuild Solution" command from the "Build" menu)
That's it!
It truly is that simple! :)
When you click the "Rebuild Solution" button, Visual Studio simply invokes Hercules's "makefile.bat" script, which in turn invokes the 'nmake' command for the make file called "makefile.msvc" (after calling a few helper batch scripts to first define the Visual Studio build environment). All of the actual building (compiling and linking) is controlled by the "makefile.msvc" make file (which, as explained, is invoked automatically by Visual Studio when you click the "Rebuild Solution" button).
Building Hercules via the Command Prompt
Of course, you will still have to install Visual Studio and make all of the required changes as described above, but once you do that, if you want to build Hercules via the command line instead of via the Visual Studio GUI itself, then simply use the provided 'makefile.bat' script:
makefile.bat RETAIL-X64 makefile.msvc 64 -aEnter the command "makefile.bat /?" for help information regarding the various required batch file parameters.